Friday, July 29, 2005

The High School Dilemma

My eldest daughter is entering high school this fall. When I was in school, the girls were required to take Home Economics and the boys had to take "Shop." There was no choice; you just took the course for your sex.

You'd think that times would have changed by now. And in one respect, they have--just not for the "smart" kids. You see, my daughter is an honors student, which means she is in the college track at high school. Most every course is already decided for her, except for a scant few electives, none of which include Shop or Home Ec. Why not? It seems that these courses are only available in the technical track. So if you don't plan on going to college, you can take your choice of Home Ec or Shop. (Or whatever their names are now.) But if you plan to attend college, you're out of luck.

Excuse me, but wouldn't it be a good thing if all teens--boys and girls--were taught some basic home management skills? Shouldn't everyone know how to sew on a button, mend a hem, or cook a simple meal? Shouldn't everyone know how to replace a water faucet washer, use a screwdriver and drill, and hammer a nail? Young adults living on their own need to know these basic skills, and woe unto you if you don't have a handy parent or friend to help you out! (I'm speaking from experience here!)

At the very least, the schools should allow students of any track to take these courses as electives.

Thursday, July 28, 2005

Private Rooms With A View

Wow, I never thought I'd stumble across a dog house plan like this one! It's perfect for my two dogs, who tolerate each other but refuse to share a bed. (Sounds like my kids.) It even has separate entrances. I guess you could go a whole day without ever having to see each other!

The plan is one of several designed for K-9 professional dogs, but homeowners apparently like them as well. (To see the full line, go to www.doghouseplans.com) The price is steeper than I envisioned, though, at $29. And despite the fact that the designers say the project can be built with simple tools, I wonder how easy it really is. They didn't give it a difficulty rating. How many hammers? One? Ten? I need to know, folks. My dogs will be dead before I finish a house that's got more than three hammers!

I haven't decided yet if this will be the "one." Right now, I'm keeping my options open. It's nearing the end of summer, and our dog house can probably make it at least until January. After the growing season is over, maybe I'll have more time to work on my projects, too. Ha! Fat chance.

It's a Dog's Life

My latest This Old House magazine includes a huge spread about dog houses that look like miniature versions of their owners' homes. It's amazing that someone would spend that much to house a dog. I love my two dogs, but they don't even like to get in the dog house when it rains! (Of course, maybe that's because they don't like their dog house. I'll have to keep the magazine away from them before they get any ideas.)

It turns out that TOH is also sponsoring a dog house contest online. Entrants get to build their pooch a new house, take a picture, and compete against other canine carpentry aficionados. Maybe that's what I should do. After all, our dog house is falling apart. It's as old as our marriage, and it certainly looks the worse for wear. (I'm speaking of the dog house here!) My husband built the thing for our first dog, Emma, 16 years ago. It's made it through rain, snow, sleet, "Hurricane Elvis," and temps as high as 100 degrees (not to mention children sitting on its roof). Perhaps the time has come to replace it with something more suitable for the 21st century.

With that in mind, I've done a little bit of browsing online to see what dog house plans are popular--and EASY. That's my first criterion. A project has to be deemed easy by the designers, because even those are hard by my standards! Secondly, the plan has to be free or available for a minimal price. That's right up there with easy. Thirdly, it has to be big enough to accommodate two dogs (one large, one small) but small enough for me to build without hiring a construction crew.

The search is on! (Just don't tell the dogs, my husband, or kids. They think I already have enough unfinished projects!)

Monday, July 25, 2005

Legacies of the past

The more carpentry I attempt to learn, the deeper my respect runs for our forefathers (and mothers!) whose skills produced such masterful structures and furnishings as those found in the Colonial era.

I have long admired the graceful yet sturdy lines of a Windsor chair, for instance. My kitchen is home to four mass-produced Windsors--all reproductions, of course, for a hand-crafted chair of this type is definitely out of my price range.

I'm not complaining--the craftswoman (or man) who can create such timeless beauty certainly deserves every penny she (or he) charges for such fine workmanship. (Isn't there a more gender-neutral word for that!!??)


I would like to watch a Windsor chair being made. I'm sure it's a tedious but satisfying process to the creator. Perhaps someday I can visit Elmore Holmes, a master woodworker who makes Windsors and other handcrafted furnishings and accessories here in Tennessee. The son of a couple at my former church, Elmore is one of those unique individuals who forged his livelihood on something outside the norm after leaving a successful "traditional" career path as a math teacher.
His current profession may not be the most glamorous job, but it must be quite fulfilling.

Like Elmore, the colonial town of Williamsburg, Virginia is trying to preserve the handcrafting skills of our early settlers through its "Historic Area," a 301-acre site where carpenters reproduce 18th century structures using authentic tools and period building manuals. They also examine the innermost parts of the actual buildings constructed during this time, revealing a hidden story of precision, attention to detail, and careful crafting. One of the modern-day turned colonial carpenters says,
"You can still see tool marks, chalk lines, and pencil marks. The buildings are a real legacy, if you know how to read them."
I wonder what legacy would be revealed within my construction. There would be plenty of tool and pencil marks, of course. But what hidden saga would a 22nd century detective cull from all those uneven joints and the backwards plywood? What story might a future resident of my house imagine when "reading" the myriad of misguided nail heads and a series of miscalculated ciphers on the wall? Would it be a satisfying mystery solved or a horror story?

Hmm. I think this story needs some additional editing.

Sunday, July 24, 2005

Revisions, Revisions!


I've spent the last week finalizing plans for the window seat between the two desk/hutch combos in my daughter's room. My intent was to use short kitchen wall cabinets for the base, then to add a full window seat top. I figured that was the best way to match the seat with the two desks, which are both made from kitchen cabinet bases, and would also be the quickest method. Less construction.

However, when I shared that plan with my daughter today, she made a face and told me she'd rather have a window seat with a top that raises instead of one with cabinet doors on the front. I tried to convince her that my method was better, and she finally acquiesced. But I could tell she still wanted the other kind.

So I sat down with my measuring tape and went to work. I'm spatially deprived, and I have trouble reading plans, much less developing them. But after two agonizing hours of measuring, estimating, drawing, and developing a step-by-step plan, I had my version of a window seat built from scratch.

One reason it took me so long (aside from my mental deficiency) was having to accommodate that darned outlet again. Whatever I install has to have the seat base set forward about 4 inches from the outlet so that you can reach in and plug or unplug things as needed. It also has to have a back that prevents items in the window seat from getting pushed up against the outlet, causing a fire hazard. To make matters worse, the lid can't be the full width of the seat because it will hit the desk trim when it's opened about 5 inches! I tweaked my plan, finally determining that I could install the top in 4 pieces: two fixed side strips, one fixed back strip, and the largest piece which opens and closes on the piano hinge.

I then trekked to Home Depot to look at plywood and get a cost estimate. While there, I couldn't help but go by the kitchen cabinets, and again I started thinking they would be a better way to go. After checking the measurements more carefully, though, I realized that they were all only 12 inches deep--not nearly the depth of 18 inches I could get with my custom-built window seat box. The kind that matched the desks also came only in 36 inch widths. I would need two sets. At 72 inches, that was exactly one inch too wide! And try as I might, there was no way to reclaim that one inch from either desk. If I used cabinets, I was stuck with one 36 inch and a lot of filler. I could've used another brand of cabinet, but the doors would have been totally different from the desks. So, I guess my daughter did me a favor. I found out before I made the thing that it wouldn't work.

So I went back to Plan B, building the seat myself from scratch. Luckily, Home Depot had everything I needed, and the total cost estimate (sans primer, paint, and screws) was only about $110. That's for a good grade of 3/4 inch plywood for the case and center support panel, 2 by 4 pine for the base and rear wall support, and piano hinge for the lid.

Now I just have to get my husband to drive the truck to the store and pick it up for me. (I hate that stick shift!) After that, there's only one problem remaining--time. I have an out-of-town wedding next Saturday, and school registration is the next week. Soccer starts soon thereafter. Oh, time! Give me a little more time!!

Grounded


In planning the window seat for my daughter's room, I have struggled with a seemingly insurmountable problem--the electrical receptacle that sits squarely in the center of the wall below the window in question.

It is the only one on that wall, which means it must be the power source for the lights on the two desks that flank it. Unfortunately, that lone receptacle is just that--one outlet, not a double one. Only one place in which to place a plug. The upper segment of the outlet is a switch that controls the security light on the outside of the house, just beneath the window.

Complicating matters is the fact that the outlet isn't even grounded. My first inclination to plug in a power strip there was stymied when I realized that its 3-prong plug wouldn't even go into the 2-prong receptacle.

A while back, I had an electrician come out to give me an estimate on extending power from that source to create two new outlets, one under each desk. The cost was exhorbitant. Even if he surface-wired it, we would have to uninstall the desk that I had already bolted to the wall and the hutch atop it.

This weekend, I finally got around to asking a handy friend about the dilemma. He's an engineer who has built quite a few things around his house and who regularly heads up construction teams to build houses for Habitat for Humanity. In other words, the man knows his stuff.

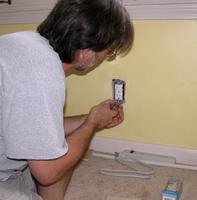
He explained that we could easily change the receptacle to a grounded outlet so it could accommodate the power strip. He made it sound so simple, but I had no experience dealing with wiring. Fortunately, my husband has done a few minor electrical repairs around the house, and he was game to tackle it. I bought the replacement receptacle yesterday, and today my husband installed it. It only took him about 15 minutes, and that included running up and down the stairs to cut off and turn on the power circuit!

I watched--carefully. This is something I want to learn. Like my sister, I'm paranoid about a lot of things, including getting hurt! Electricity is not something I've ever desired to play around with. But I'm willing, even anxious, to learn the basics. Don't get me wrong, when it comes to big jobs, I'll be the first one to call an electrician. I recently had one come out to change my mother's receptacle so it would accommodate a larger air conditioning unit. In a 50-plus-year-old house, I don't want to fool around with wiring! But for pete's sake, I ought to be able to replace a switch in my own house, wouldn't you think?

Tuesday, July 19, 2005

I'm not the only crazy one

While on vacation, I read this wonderful article in the Bangor Daily News about a local couple who have renovated their historic home using salvaged, recycled, and discount materials. Marian and Mort Syversen are DIY-ers who, like me, are willing to try something new and learn from their mistakes. Check out the entire article. It's worth the read, very inspiring, and makes me realize that there are other crazy people just like me out there!

Monday, July 18, 2005

Vacation Over


Back at home, and now I'm facing a weekend ahead of unfinished projects here to tackle, like the hutch shelves. In the meantime, my sister took this picture of the new screen door handle we painted and installed at her place this week. As you can tell, we didn't have time to fill all the previous screw holes, which looked as if a woodpecker had made it his temporary home. But we tried to camoflauge a bit by painting over them. Let's see if it holds up.

Sis gave me a subscription to Family Handyman for my birthday, in addition to two cute Xmas ornaments for DIY-ers. A fun vacation, but I'm glad to be home safely. I HATE to fly!

Friday, July 15, 2005

Lessons Learned

I hesitate to write about some things because I think it makes me look stupid. But my sister, who may not always know best, tells me I should view my public mistakes as encouragement for other women tackling DIY jobs. So here goes.

Since we were unable to find appropriate cabinet handles to fit the current screw holes, we opted to spray paint the old ones with shiny brass paint. (This was, of course, after checking to be sure they weren't real brass. Just brass-plated.) We did the proper preparation: cleaning, sanding, cleaning again, drying, and priming. I donned a pair of big rubber gloves, shook the can appropriately, then began to spray. Almost immediately, the paint came out in sputters, all over the newspaper and the handles. I shook some more. Same problem. I turned the can upside down and cleared the nozzle before trying again. Sputters everywhere. I thought we had a bad can of paint and was getting very angry. But I finally figured it out--because the gloves were really too big for my hand, there was a small, floppy fingertip that apparently kept getting in the way of the nozzle each time I pressed down. I removed the glove, tried again, and voila! Success. Of course, the handles looked so spotted by this time that I had to sand and reprime. But at least we figured out the problem.

So, if you're ever spray-painting, and you think you're a sputtering idiot, check your fingertips.

Thursday, July 14, 2005

This is MY kind of vacation!


In addition to eating blueberry pancakes, shopping, and being with family, I'm having the kind of vacation every handymama wants . . . I'm getting to do some stuff around the house! My sister is being kind enough to let me help her with a few small things to freshen up her house, which is currently on the market.

Yesterday, we hit the local Home Depot (which is slightly inferior to the one in my hometown--less inventory) and the town's homegrown hardware store. In neither store did we find what we really needed, which was a peculiarly-sized cabinet handle. So instead of replacing a bunch of hardware, we're now going to try to clean it or spray paint it.

I'm also going to try to fill a couple of screw holes in a bathroom tile that were drilled by the long-gone previous owner. The Home Depot clerk wasn't much help there. He didn't impress me with his hardware knowledge. We ended up buying a small container of premixed grout to try. We don't want to have to pry off the tile and replace it. I'm afraid I'd wreck the whole bathroom since I've never done that! So if the grout doesn't work well enough, we'll just replace the towel ring that the prior owner installed there, even though it's a weird place to put one :-)

I celebrated my 49th birthday yesterday while I was here on vacation. My brother-in-law gave me a pair of safety goggles and a mini-crowbar! My sister also gave me an adorable DIY Christmas tree ornament. The woman looks just like me, so says my daughter, right down to the crazy hair!

Monday, July 11, 2005

One Last Tip

In browsing magazines at the store today in search of some reading material for the vacation flight, I perused the latest Family Handyman. I would've bought it, but 80% of this month's issue was irrelevant to me. I did notice one tip, though. The teaser on the front grabbed me immediately--it was about how to caulk perfectly!

The tip? Lay masking tape evenly on each side of the corner or edge where you want to caulk. Make sure it's the same distance from the caulking point on each side. Then, lay your bead of caulk, smooth, and carefully remove the tape. Perfect line every time! Or so they say. I can't wait to try that one out.

On Vacation

I'm leaving on vacation for a week and may not post. So don't read!

Saturday, July 09, 2005

Making Mistakes


Allowing yourself the freedom to make mistakes, and learn from them, is a liberating sensation. It makes you more willing to take chances and try new things.

The Handymama Chronicles' mantra of learning woodworking, one mistake at a time, fits me well. When I made the first desk/hutch unit, I made many more mistakes than I will (hopefully) make this round. I learned a lot, just by doing.

I had always heard growing up that sometimes you have to let kids make mistakes, for they will never learn some things unless they experience them. That's the same way with me, when it comes to building things. I have to see and do for myself. And if (when) I make a mistake, you can bet I'll be less apt to make the same mistake next time.

So:
  • On the second desk/hutch, everything is perfectly level, every direction you check.
  • I will not permanently affix the top to the desk bases until the cutout for the electrical cords is done.
  • I will rout the wood for the hutch sides in one long piece before cutting to size.
  • I will use screws only to install the metal shelf supports.
  • I will measure at least 5 times before cutting anything.
  • I will use a dust mask when cutting, routing, and painting.
  • I will buy enough wood so I don't have to keep going back to Home Depot.

DIY-expert Lynda Lyday has good advice for any beginner carpenter, including women. Her first and most important tip? She says, "Don't be a perfectionist. Allow yourself three mistakes because you'll never get started if you don't."

Only three? Uh-oh.

Wednesday, July 06, 2005

There Must Be A Secret


I hate caulking. No matter how hard I try, I make a mess of it.

Today, I was standing outside a restaurant with my co-workers, waiting in line to be seated, when I spied a construction worker inside the window of the neighboring building. I could tell that he was caulking the window seals, but I couldn't believe how easily he seemed to do it. One-handed, no less! Zoom, zoom--his arm smoothly and quickly went from one end of the window to the other. Then he repeated the same, swift movement as I visualized him smoothing the bead of caulk with his finger. Before I could breathe in and out, he was done and ready to move on to the next window.

I wanted to shout out, "Hey, down here! Show me how you do that! What's your secret?" But alas, the windows were the kind you can't even open. My colleagues would've pushed me out of the line if I'd done it anyway, pretending that I was some deranged person off her medication.

The only thing I can figure out is this: caulking must take lots and lots and lots of practice. And along with that, of course, must come lots and lots and lots of mistakes. That's how my learning curve goes, anyway. I learn better by mistake than by reading a book or watching a demo on TV. It's just unfortunate that I either have to redo the project to correct each mistake or live with the less-than-perfect results. So far, I've done a little of both. (OK, maybe a lot of both.)

I think this weekend I'll buy some cheap caulk and practice on scrap wood. We've got lots of that in the garage, and my husband wants to get rid of it anyway. Practice may not make perfect in my workshop, but it surely can't make things any worse.

Tuesday, July 05, 2005

Manual Labor


Every time I use my router, I have to dig out the manual and re-read the instructions on how to install the bit and adjust the depth. If I used it every week, I could probably remember that info, but I don't. So this handy tip from DIY network hit home with me today. (Of course, I did have to insert an apostrophe to ensure their punctuation was correct!)

DIY HANDY TIP

"
The owner's manuals for power tools can come in handy even after you're familiar with the basic operation of your tools. But like most owner's manuals, they tend to become lost and scattered over time. Consider keeping all of the owner's manuals for the power tools in your shop in a single three-ring binder (figure R). In that way, you'll always know where to find them. Moreover, in a binder the manuals are more likely to stay clean, flat and readable than they would if crammed into the bottom of a drawer."

Not My Kind of Project

This one makes me kind of uncomfortable. I don't think I could do it, but it surely seems like a labor of love for this fellow. Click on the headline below for the full story.


Carpenter makes casket for his still-alive granny

JACKSON (AP) -- Jackson carpenter Lance Scofield has been pounding nails since he was old enough to wield a hammer, but the most meaningful project he's built is a casket for his grandmother.

Monday, July 04, 2005

Blastoff!

I see fireworks, and it's not because it's Independence Day (though I did see a perfectly lovely display of pyrotechnics last night at our community celebration). The explosion I see is the beautiful end of Phase 2 of the desk/hutch project!!!!

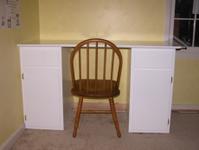
Yes, today I finished the desktop, installed it, and put on the cabinet doors. Wow--what a difference it makes at that end of the room! My daughter even commented how big the room seemed once it was put together. All those individual pieces--cabinets, doors, tools, makeshift top, etc.--took up so much room. But once it was all installed, it was a nice, clean line of white. I've included two pix here: one shows the just-completed desk. The other is a wide view of that end of the room, also showing the matching desk/hutch on the right side (sans final trim).

Won't that window seat look good when it's done? It will really tie the two sides together. Of course, I also need to repaint all the window trim white. Right now, it's a light cream--enough difference to make it look "dirty."

Everything today went fine, surprisingly. The only near mishap I had was picking up the wrong screw to attach the hinges. I inadvertently started with the longer screw on the door, and caught myself just in time to feel the hint of it coming through the other side. Yikes! I'm glad that didn't happen. (Thanks to my hardware-smart hubby who noticed that I had simply grabbed the wrong screw, or I would've been off to Home Depot on July 4th! He also held the cabinet doors for me while I attached the hinges, and he graciously notched the corner of the desktop trim with the coping saw so it would fit snugly against the window.)

And I even had time to entertain family and friends for an Independence Day cookout, complete with my husband's delicious burgers. Happy 4th! Not only did I celebrate our country's heritage, I celebrated my independence from Phase 2!!!

Now, on to Phase 3! I'm sure that will be worth at least a couple of months' blogging :0

Sunday, July 03, 2005

T Minus 1 Day

Things are progressing well! After cleaning up the Liquid Nails excess (and the caulk gun), sanding (and sanding, and sanding, and sanding), caulking, sanding again (and sanding, etc.), I got a complete coat of paint on the desktop and trim. Tomorrow morning, the final coat goes on! And by day's end, I will celebrate my independence from Phase 2 of the project!

Note the new blog design. I think it makes it easier to read with the white background. Much cleaner and simpler--which should also please my sister.

I also finally figured out how to add a photo to my profile. Me in action--my husband says I look like someone from outer space. Hey, at least I'm trying to protect my health.

Saturday, July 02, 2005

One Step at a Time


Little by little, I'm getting this desk finished. Today, I managed to sand the desktop, put one coat of paint on it, and buy, cut, prime, and install the trim. Progress! And I didn't spend the whole day on it, either. In fact, it only took me a couple of hours off and on to get the job done, excluding paint drying time. (It really is true that watching paint dry is as boring as you can imagine.)

The only glitch was the Liquid Nails, which I used as an adhesive to glue the trim onto the desktop edges before clamping and nailing. (This time, I knew to drill my nail holes in the trim before installing it, thus avoiding wood splitting.) But since the LN was a previously opened tube, I had trouble getting it started once I put it in the caulk gun. There was about one inch of hardened LN in the end of the tube opening. I pried some of it out with a nail, but it there was just too much embedded too deeply. So I either had to toss the LN and open a new tube or cut the end of it off below the "clog." Knowing there was nearly a full can of LN inside, I opted to cut off the offending piece. Of course, that also meant my tip was now about 5 times bigger than I needed. So my LN went on a little thick. I can clean up the excess tomorrow when I sand.

The problem that I didn't foresee, however, was this: when I was trying to force the hardened plug out of the tip (before cutting it off), I squeezed the caulk gun handle so much that it popped off the bottom of the tube. I didn't know this until I was done with the job and tried to remove the tube from the caulk gun. It was a mess! Fortunately, I caught it quickly and moved to complete the task over the top of the garage garbage can. There's still some LN left in the gun, but I'll clean that up tomorrow with mineral spirits.

Long story short, I feel pretty good about what I accomplished today on the project. And I'm fairly certain that by Monday's end, the desktop will be installed, and Phase 2 of the left desk will be completed. Then, on to the shelves! But I think those will have to wait til I get back from Maine. No way I can do those in one weekend!

Friday, July 01, 2005

Next project?


Doesn't this look great? This is next thing on my "to do" list . . . after I finish the desk, hutch, curtains, and painting. It looks like something even I could do!

Ah, the weekend!

Friday evenings are like a blank piece of paper to an artist--they are the promise of things to come, things yet undecided or undone, anticipation and fear. Couple that with a holiday weekend, and the anxiety is doubled!

Three whole days. Three whole days to do things, or not to do things. Should I sleep late and loll in the luxury of a July morning? Or should I get up early and get going on my projects before anyone else arises? Should I finish this project or that one? If I choose to finish this project, will I really have enough time during the weekend to do it, or will it still be left incomplete come Tuesday morning? Should I aim to start a new project that I'm sure can be finished in the weekend? What will happen if it's not? Then I'll have even more unfinished projects!

It's like wishing that you would win the lottery. It sounds wonderful to imagine the dilemma of figuring out ways to spend all that money. But once you start really thinking about it, your blood pressure starts rising. Should I pay off the house and continue to live there? Or should I sell it, buy some land, and build something new? How much money should I put in the bank? Whom should I give money to? There are so many worthy charities close to my heart. Should I give a huge sum to one or divide it up among them all? And what about investing? Will my investments be wise ones? Can I find a trustworthy financial advisor to help me? And how much will that cost???? It's a never-ending, vicious cycle.

Suffice it to say that I don't play the lottery :-)

But I am looking forward to the three-day weekend--I think. I did get to Sherwin-Williams and get the paint to finish the desktop. And while I was there, I picked up three 10-cent paper cone-shaped strainers. They won't fit over the top of the paint can, but perhaps my husband can pour the paint through while I hold the strainer. At least I don't have to worry about it this weekend. A fresh can of paint won't need straining--I hope!

Funny thing I noticed while at the paint store. They had those mesh paint strainer thingies like I had before. But it said they were supposed to fit onto some kind of paint sprayer--not a paint can. No wonder it was so messy for me! Like my blog says, I'm learning this thing one mistake at a time.
Free Counters
Hit Counter