Monday, August 29, 2005

Camille Revisited

With the news of Hurricane Katrina hitting the gulf coast, I can't help but think of 1969's Hurricane Camille. I was 13 then, and it's the first memory I have of a hurricane. We had just been to the coast the previous summer on my first visit there, and I felt so badly for the residents. It was the first time I had ever sent money to a relief organization. I felt so helpless.

That's the way I feel today. Watching the devastating video and listening to the words of residents caught in the storm, I wish there was something I could do to help. I called the local motels in my town today and found out that they were full and sending people away. I thought perhaps my town administration could open a relief shelter at the community center and called town hall to ask about it. But I found out later that a shelter not too far from here still had room for hurricane refugees. So the town decided not to do it, understandably so.

I talked to the local Red Cross, and they said the hotels were being very generous in our community and that they were unaware of any special needs that had not been addressed. Except for money, of course. As is the case in so many of these natural disasters, what the relief organizations really need is money. And so, once again, I will send money to help what looks like a hopeless situation. And I will still feel so helpless. I know the money will be put to good use, and I am glad to give it. I just wish I could do more. I can't imagine losing your home, your livelihood, your town. It breaks my heart.

A hurricane refugee was interviewed on the news tonight here. She finally found a hotel room after being turned away from several facilities that were full. She is expecting a baby in one week. It's unimaginable.

I watched another woman in Biloxi, MS on the news yesterday as she hurriedly carried bottles of water to her house before the storm hit. As she passed the camera, she peered into the lens and said plaintively, "Pray for us!"

Give money. Pray. What else can we do?

Saturday, August 27, 2005

Back Where I Was

OK, after working half of today on the window seat, I'm finally back to where I was last Sunday night--except the project is now about 2" shorter, which was the whole idea behind "ripping" it out and redoing the base frame. The seat is back in place and screwed to the frame, the back support has been lowered and rescrewed, the power strip has been lowered and rescrewed, and the inside panels have been installed.

The only "new" thing I accomplished was to cut the holes for the power cords to pass through. I used a spade bit for the first time, which was exciting! It cuts a perfect circle out of the wood. I cut one hole in the upper side of the right desk cabinet, then another hole in the bottom left side. The two holes allow the desk lamp cord to pass through the rear of the cabinet (behind the drawer) and out the bottom behind the window seat. Once the top is on, you won't be able to see the exit hole. Unfortunately, with the power strip affixed to the wall, the lamp cord is no longer long enough to reach the outlet! I may have to detach the strip and just let it be "loose" back there where it can be moved from side to side as needed. We'll see.

In the meantime, the unsecured window seat top is now resting atop the seat. At least my daughter can sit on it this week if needed. I'll probably work on cutting and screwing the top next Saturday. I think I've bitten off all I can chew this weekend. My battery drained (again!), and I had to stop working for several hours to give it time to recharge. It would've nice if I could've done the same, but I had to go grocery shopping. C'est la vie. (That's for you, sis.)

Friday, August 26, 2005

No Turning Back


When I was growing up, our church choir often sang an anthem with the refrain, "No turning back." That's how I felt Wednesday afternoon when I decided to take the plunge and "rip out" the window seat to redo the frame. Once I unscrewed the frame, I realized there was now "no turning back." It would be near impossible to put it back together exactly the way it had been, so I had no choice but to forge ahead. And forge I did.

Of course, nothing ever goes smoothly, and this was no exception. Oh, the frame unscrewed nicely, but it turned out to be a lot harder than I expected to reassemble it in the form I needed. For example, I quickly discovered that the screws I had used previously were now too short because the 2x4 pieces were horizontal, not vertical. That meant instead of screwing through about just under 4 inches of wood, I now had to screw through just under 8 inches! My longest screw was 3 1/2 inches. To complicate matters, my drill bit wasn't even long enough to make the pilot hole! I tried to drill from one side, then the other, hoping the two channels would meet in the middle. But alas, I was off just enough to screw it up. (No pun intended!)

So off to Home Depot I went. They had no screws long enough, so I had to buy lag bolts. They also had no regular drill bits long enough, and there was no one in the tool department to ask, so I took a chance on a long drill bit that's supposed to be for brick and concrete.

When I got home, it took me about four times as long to make one connection as it should have taken. I had to drill with three bits--a small one to avoid splitting the wood, a larger one to make the hole deeper and a bit wider, then the huge concrete bit to drill out the bottom. Screwing in the lag bolts also took longer. I had to do that by hand with a driver. (I think my husband had a driver tip to fit on the power drill, but I couldn't figure out where it was.) Suffice it to say that my arm muscles got quite a workout!

After sweating furiously for about two hours, I finally had to call a halt to my work for the day. I had finished about 2/3 of the redone frame. But it was enough to slide it back against the wall so I could replace the seat on top make it look like it hadn't been touched. (I really didn't want my husband to know I was doing this til it was done because I knew he would chastise me for going to the extra work, esp. after he had helped me screw the seat into the frame in the first place.)

I'll finish the job tomorrow morning--hopefully more quickly than I started it. Then I can proceed to the top installation. But I'm already happy with the way it appears. The lower height looks much better, and I think it will be perfect once the thick cushion is installed on top.

Tuesday, August 23, 2005

Still Thinking

I still haven't decided about redoing the window seat frame. But today I stopped by the fabric store to check out the thickness of those foam cushions. I'm trying to figure out if the thickness of the cushion, on top of the already tall window seat, will be too tall.

Hmmm. I've never had that problem--too tall! I'm about 5' 1" so my problem is usually the opposite. Maybe that's why the window seat seems to tall for me to sit on anyway :-)

Sunday, August 21, 2005

On Second Thought

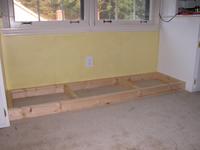
Now that I've stared at the pix below for a few minutes, I'm thinking I may just have to unscrew the bottom screws, lift the carcass off, and redo the base frame :-(

With the cushion, I'm afraid the seat will be as high as the desks, and that will look weird. It shouldn't be too hard to reassemble the frame, should it? Somebody tell me it'll be easy!!! At least it's not glued.

Ya think I'll ever finish this thing????????????

Have A Seat!


Believe it or not . . . here it is! Yes, this weekend I finally reached the point where we could install the window seat in my daughter's room. After spending much of yesterday working on the extra supports, today I put in the 2x4 support beam for the top back, leveled (and leveled and leveled and leveled) the carcass, and finally screwed it into the base frame. Thanks to my husband for his help in toting the thing (which weighs a ton) up the stairs and for installing the power strip behind the window seat. He also drilled the pilot holes for the base screws while I was searching for the screws :-)

I didn't get to finish screwing in the last support panels, which abut the 2x4 pieces inside the carcass. My drill battery died again on me! But it surely got a workout today, so I can't begrudge it a rest.

In the photos above, the top is not set all the way back due to an electrical cord that's currently in the way. That will be hidden as soon as I bore a hole through the right desk cabinet's left side. Once the lid is permanently affixed, you will be able to lift it and reach behind the windowseat to access the power strip. It's not a huge gap, but it's big enough for a hand and adult arm to get in there when needed.

The window seat also looks like it's a different color in the photos. That's because it's only got primer on it, not the two coats of white paint that will match it to the desks. I also need to add the toekick trim and trim, rout the front edge of the top, and trim the other edges as needed.

The seat is a bit higher than I planned originally. That's because I built my 2x4 base frame vertically instead of horizontally. In other words, I laid the 2x4 pieces so they were taller than they were wide. I should've laid them flat; then the frame would've been about 2" shorter. Once we add a thick cushion, the seat will be higher than I wanted. But my daughter's tall, so she can adapt better than I could.

My younger daughter has already decided that she can sleep on the seat once it's finished. She's closer to my height!

A hard weekend's work done. My back aches, I have scratches on my shins, and my mind is tired of measuring. I must be worn out because I ate at the dinner table with my dust mask pulled up on top of my head! I didn't even realize it, and no one bothered to tell me. I guess they just figured it was par for the course. Crazy carpenters!

Saturday, August 20, 2005

SHE Did It!

I must admit that I was more than a little proud today.

As usual for a Saturday, I had spent the morning working on my project in the garage. The windowseat, table saw, miter saw, circular saw, sawhorses (we carpenters just love saws, don't we?), Liquid Nails, and a carpet of sawdust (see?) took up the entire space. After about two hours of work, I cleaned myself up and stopped to take my daughters shopping.

En route home, we picked up a friend of my youngest daughter and brought her back with us for an afternoon visit. I saw the girl eye the mass of tools as we entered the garage and overheard her ask my daughter, "What's he making?" My daughter didn't bat an eye as she quickly replied, "It's she. My mom's the one making it!"

There goes another button!

Thursday, August 18, 2005

They Can Thank Me Later

I read today that Lowe's quarterly profits rose 20% and Home Depot's rose 14%. I don't want to think about how much of that was from my pocket.

Lowe's also reported that its average purchase is now $67.40. I guess that makes me an "above average" consumer. Whoop-dee-doo.

Wednesday, August 17, 2005

Our Throwaway Society

My recent experiences of dying drills have alerted me to the need to replace the battery in my husband's drill. It's larger and older than mine, so it's been used much more. The battery will barely hold a charge for a few screw turns now before it dies.

This is no fancy, expensive drill. It's a Skill basic drill model with a Nicad rechargeable battery. I haven't been to Home Depot or Lowe's yet to price a replacement battery, but I just read the following on Consumer Reports:

A cordless drill's battery can be discharged and recharged roughly 500 times before it must be replaced. While batteries can last five years or more, frequent use can deplete them sooner. At $30 to $80 each for many of the batteries that power drills, replacing them can cost as much as buying a new cordless drill.

Battery replacement may be less of a concern if you're buying a $250 drill you plan to keep for a while. And for models that cost less than $100, simply replacing the drill may make more sense than buying a new pair of batteries. Otherwise, consider battery cost along with the drill.

Sort of defeats the purpose of having a rechargeable battery in the first place, doesn't it? You end up creating even more waste by having to buy an entire new drill just to get a battery. It's the same thing with electronics like VCRs and CD players. Our landfills are brimming with products that we toss because they're more expensive to fix than to replace.

As a recycler at heart, that really bothers me. I try to recycle everything that our community sanitation trucks take: paper, aluminum, tin, glass, and certain plastics. I buy many used things at garage sales rather than at stores. I give old clothing and other goods to friends or to the Goodwill rather than throw them away. And even in the workshop, I try to recycle. Just ask my husband--he gets so frustrated because I try to save every little scrap of wood! (Well, they sometimes DO come in handy!)

I hope the tool industry does its part to change this course. I, for one, will be looking carefully at my next tool purchase to see how environmentally friendly it is. If we all did that, maybe the landfills would be a little less crowded.

Monday, August 15, 2005

A Happy Girl


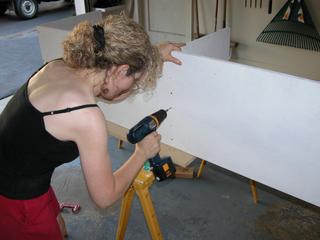
Here's my teenager trying out the window seat still under construction. She probably thinks I'll never get her room finished! Very patient girl.

All Screwed Up


Dedicate an entire weekend to a project, and you just might get something accomplished! Of course, I thought I got more done than I really did, but more on that in a moment.

On Saturday, I laid out the window seat parts on the floor of the garage and finished my plan for the assembly. (Considering all the non-project stuff I had to do Saturday, I was lucky I got that much done.)

Sunday afternoon, though, was a bigger story. I routed rabbets in the bottom of the box to accommodate the vertical sides and center support. (Every time I get out the router, I have to reacquaint myself with its operation. This is very frustrating, because it takes so much time away from actually doing the project. But it prevents me from making stupid mistakes--well, at least it prevents me from making really stupid mistakes!)

Next step was to dry fit the base, side and center support panels, and the front and back. It all looked good, so I then proceeded to glue and screw the three panels. This time, I successfully maneuvered the caulk gun, with a little help from my hubby to get the darn thing started. No Liquid Nails on me or the floor :-)

After letting that set, I dry fitted the front and back pieces. They fit remarkably well for an amateur. Everything squared up, so I glued and nailed them in place. Well, I glued and nailed one of them--the other just got nailed because I simply forgot to apply the glue til I had set the nail heads! I wasn't about to dissassemble that.

The only casualty in the whole affair was my left hand middle finger knuckle. I was so excited about finishing the nailing of the last piece that I got a little slap happy with the hammer. Nothing like whacking your knuckle instead of the nail!

At any rate, I was pleased with the progress. But today, after discussing it with a colleague who's much more experienced with woodworking, I realized that I need to go back and add some things before proceeding to installation of the carcass. He told me I really should add 2x4 supports in each corner of the box as well as some 1x4 pieces below the lid on each side of the seat. Knowing that this will be used by a teenager, I want to do everything I can to ensure it is strong and stable. So I will take two steps back to fix that omission. Then I can go on and secure the seat to the 2x4 frame that's already in place. After that, it's the top!


Saturday, August 13, 2005

The Straight and Narrow

I never knew how hard it was to get something straight until I started fooling around with carpentry. Oh, I've had my share of crooked pictures, and the seams I learned to sew as a teen were never perfectly straight. But they were usually close enough.

In carpentry, however, if you miss the mark when sawing or assembling something, your whole project is out of kilter! Even the slightest mistake can make the next step impossible, or at best, unprofessional-looking.

Today, I spent about 30 minutes constructing a square jig to use when assembling the window seat. I got the idea from a photo in Family Handyman, which showed the carpenter assembling a cabinet using this method. The jig was simply two pieces of 2x4 lumber screwed together at a right angle. Of course, the catch is you have to get the angle on the jig precisely right if you want the project to be right.

I thought it would be relatively easy. Just use a right angle ruler (I still don't know the proper name for these things), butt it up against the 2x4 pieces, drill, and screw. (If you ask why I don't use the ruler for my jig in the first place, it's because the ruler is a flat piece of metal. I need something hefty that I can push my box corners against and clamp them to.)

At any rate, it was harder than I thought. I couldn't clamp the ruler to the 2x4 pieces, so I had to hold it in place while I held the 2x4 pieces and used the drill/screwdriver. I needed two more hands. Of course, the battery on the drill died in the middle of it all--we really need to replace that thing! I had to go upstairs and get my new drill to finish it off.

It all seems square now, so tomorrow I can begin the assembly. The only thing I need to do first is rout a rabbet on the ends of the window seat bottom. The sides will then set into the rabbet before I glue and screw the pieces together.

That shouldn't be too hard. But then, I find myself eating those words a lot, don't I?

Thursday, August 11, 2005

Home Depot Targets Women

Home Depot is opening a new prototype store in Florida. The building is slated to have wider aisles, lots of glass and ornamental designs on the facade, better lighting, and a less-industrial warehouse appearance--all in an effort to woo women.
"Better than 50 percent of the decisions about what products to buy in our stores are driven by women," said Don Harrison, an Atlanta-based spokesman for the home improvement chain.
Home Depot says the changes are based on customer exit surveys and marketing studies. I wonder what type of women they surveyed? I don't pay any attention to the touchy-feely atmosphere at the Home Depot I patronize. I just want to find the stuff I'm looking for at a decent price.

But these women apparently are more interested in having all the "decor" items in one place.

Although the new store will target women, it won't ignore contractors and the handyman, Harrison said. Merchandise will stay the same.
So, it sounds like their approach to the females is to assume they just want to buy kitchen appliances (isn't that where we're supposed to stay, anyway?), curtain rods, and rugs. But the handymen and contractors want the "real" stuff?

If I was in the market for decor items, HD wouldn't be my first stop. But a good drill bit or 2x4? That's my kind of HD!

Wednesday, August 10, 2005

First Issue

Quick post--I received my first issue of Family Handyman in the mail today, a gift from my sister. (Thanks!) It was great! I've already learned some invaluable tips on cutting plywood. It's just too bad that the magazine came the week after I finished cutting the window seat pieces!

I'm looking forward to more issues of this magazine. I'll learn a lot, and perhaps its publishers will, too--like the growing number of women who subscribe. Maybe they'll consider changing the name!

Sunday, August 07, 2005

Step by Step


OK, so I didn't get as much done today as I had hoped. But what I accomplished was satisfying! The three remaining pieces of wood (sides and center support) are cut and primed, and the frame is complete. It was the wood-cutting that was the hardest part. The table saw is great--when you have a straight edge to slide along the fence. And we didn't have one. And the piece of plywood was too big for the table saw. So we had to use the circular saw with a makeshift fence. Suffice it to say that the cutting wasn't perfect. I had to sand down the excess.

The frame went fairly well, except for both drills dying on me. It's sad when I have more energy than two drills!!!! I finally got the work done, and the frame is now level and screwed to the wall studs.

It was a long day, but worthwhile. The cleanup took as much time as the project! But I can happily say that I have now finished steps 1 and 2 of my project plan. They sounded so simple and quick on paper, but reality is always different.

Now I can rest my aching back til next weekend :-)

Saturday, August 06, 2005

Primed and Ready to Go!

Quick post--I sanded and primed the large pieces for the window seat today. Yea! Tomorrow after church, I hope to cut and assemble the 2x4 frame, screw it to the wall studs, and then assemble most of the window seat "box." I still have to cut the center divider/support piece, sand, and prime it. I just ran out of room today in the garage and couldn't work that in. It would be so great if I could have the box complete tomorrow except for the top and painting! We'll see.

I hope I can remember the way I wanted to construct it. I have my sketch and my steps typed out, but it's been a week since I wrote them. And with my menopausal brain, I'm apt to have trouble remembering. Better get a good night's sleep to recharge those memory cells!

Thursday, August 04, 2005

Recouping the Cost

I guess our investments in redoing the kitchen and now the siding will pay off for us eventually. At least that's what I gather from a remodeling study that estimated how much money homeowners recoup from the cost of specific room renovations. Here are the top three:

1. Kitchen remodel - 92.9% return
The study said the most popular minor improvements were adding dual sinks and cooking stations, undercabinet lighting, marble or granite countertops, and ceramic tile backsplashes. OK, so we didn't do all of that. But we did manage to fit in the granite counters and tile backsplash, though I don't think the tiles are ceramic. I don't know what they are, except pretty! And we replaced all the kitchen cabinets, sink, appliances, and the floor, plus painting and adding a massive hutch. Except for the floor, I really like the way it turned out. It's not a gourmet kitchen, but it's roomy and efficient.

2. Siding replacement - 92.8% return
It had better be a good return, because this siding replacement is costing a fortune! We've opted for Hardiplank, hoping that its lifetime warranty will never need to be used. After all, if Southern Living says its the way to go, who are we to argue? And anything has to be better than this "squirrel buffet" cedar stuff we've got now.

3. Bathroom remodel (mid-range) - 90.1% return
This was supposed to be our next major project right after the kitchen, but the old siding just wouldn't wait. So I may never get to this renovation, which has been one of my top priorities ever since we moved into this house 10 years ago. The master bath is the pits! It's a crackerbox of a bathroom, with a tiny sink and "rustic" vanity cabinet. There's almost no mirror space, even less light from the 1/2 window, the tub has rickety sliding doors, and the uneven floor has the worst tile I've ever seen on it! (See why I think this bathroom will win the ugly contest??!) We had gotten estimates of $10,000 and up on a "low-end" remodel, which meant taking about 3 extra feet from the adjoining room, replacing the tub with a large shower, installing a double vanity and vent fan, and fixing/retiling the floor. That's about $7,000 less than the siding estimate! But you gotta do what you gotta do. Better to replace the exterior before it falls off, exposing the interior to all sorts of perils, I suppose.

It's strange, but when we decided which parts of the house to renovate, we never took into consideration the standard return on our investment. It's good to know, after the fact, that we started with the most worthwhile project and have moved on to the second-most popular home investment. Now if we can just make it to that third one!

Wednesday, August 03, 2005

Plumber's Helper

The bath fixtures manufacturer, American Standard, has just come out with a free "for women only" guide to DIY plumbing projects.
"American Standard helps empower women to do it themselves," said plumber and interior designer Lori Sardinha-Costa.
While I give kudos to American Standard for recognizing the female DIY market, I am disappointed in their PR methods, which included a contest to find the nation's "Sexiest Plumber." Sardinha-Costa was the winner. Is that the only way they can find to legitimize women in this industry? She was apparently the only woman among 13 finalists for the "honor." The winner was chosen from a web poll--undoubtedly dominated by male respondents.

To get a copy of the free booklet, Refresh: for Women Only, you have to call the company or fill out an application on the American Standard website.

The company's press release, though, sheds little light on how much true DIY information is in the publication. Here's how it describes it:
The special 12-page guide — called Refresh: For Women Only — features kitchen and bath design ideas and inspirations for choosing and installing faucets, sinks, toilets, bathtubs, whirlpools and shower/spas. Research shows that nearly 80 percent of women are responsible for selecting the style and color for the materials of their bathroom and kitchen remodels. Additionally, more than 60 percent of women purchase the actual materials needed for their bathroom and kitchen remodels.*

“As more women make decisions about home improvements and take the lead in areas from planning and designing to fixing and installing, American Standard is pleased to provide smart, simple and manageable do-it-yourself kitchen and bath solutions from trusted experts,” says Jeannette Long, director, marketing communications, American Standard.


Refresh: For Women Only
includes Sardinha-Costa’s
“Tips of the Trade for Women DIYers,” featuring her own common-sense solutions to typical plumbing problems. It also provides American Standard bath and kitchen product solutions to make life easier. For example, women who are tired of tinkering with toilet repairs will find information on the virtually clog-free Champion® flushing system, a new technology that allows them to toss out their plungers for good. Other solutions include installing the new Reliant+™ EasyTouch™ faucet, which has an innovative light touch button that won’t wear out and a smooth WhisperGlide™ hose for quiet operation.
I don't see any signs of DIY there! Rather, that sounds like it's selling you a product that minimizes your chance of having to do anything! While I shouldn't pass judgment on material that I admittedly haven't read yet, I am dubious about the DIY value this marketing piece holds.

On a lighter note, American Standard has launched yet another contest--this one to find the ugliest bathroom and the oldest American Standard toilet. Prizes include a bathroom makeover with their products. I'm definitely going to enter that one. I dare you to beat me!

Monday, August 01, 2005

Buzz, Buzz!

That's the sweet sound of a saw cutting wood! Yes, I finally got the wood to build the window seat. This weekend, I went to Home Depot and bought 3/4-inch oak plywood (which was only $1 per sheet more than the birch) for the cabinetry. I also got the piano hinges, framing material, etc. To make things easier, I had HD cut the wood to my specifications. Not only would that save me time and hassle at home, it would mean that I could fit it into my car without bugging my husband to bring the pickup. Unfortunately, I found out that I couldn't maneuver the 72-inch long pieces into the car doors (though my calculations showed they would've fit if I could've just gotten them through there). So I had to call my hubby from the HD parking lot to come load it up. He understood :-)

Most of the wood is now in the dining room to be sure it doesn't get dinged or warped in the garage til next weekend. My plan is to cut the smaller cabinetry pieces and framing Saturday, then prime it all. By Sunday afternoon, I should be able to assemble the window seat and install it. The first coat of paint will have to wait til the following weekend. I think I'll wait to do the trim til the last hutch is completed. That way I can trim out the entire project at once.

My daughter is excited. She's finally starting to envision the whole thing as it will look completed. She's been so patient!
Free Counters
Hit Counter